Baking Experiences
  • Home
  • Gallery
  • Contact me

Traditional Yule Log cake

12/28/2013

1 Comment

 
PictureBûche de Noël
'tis the season and with it, its delicious indulgences. One cannot help but look forward to this time of year and its traditions, especially the culinary ones, from bread, to cakes, pies or cookies.

Now, I'm not one of those who go crazy baking cookies... my last post about it was my latest attempt.
I like them, don't get me wrong, but I'm not into making dozens after dozens and giving them away to everyone and all that... Instead, I have my favorites, memories of my childhood, that I am now sharing with my daughter. She now looks forward to these traditions, even though she's not yet interested in learning how to make them.

The Yule Log cake is a French/Belgian tradition. It is a cake shaped like a log, to refer to the tradition of burning a huge log for the 12 days of the Christmas season (then called Yule). This was supposed to bring good luck for the year. A mix of pre-Christian and Christian traditions here, as is often the case.
Picture
If you go to a pastry shop in France or in Belgium, just before Christmas, you will have so many choices in yule log cakes, going from extremely traditional to avant-garde modern, to ice-cream cakes. Needless to say, it might be a traditional cake, but you will rarely experience twice the same one.
Picture
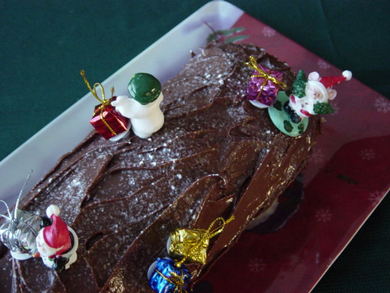
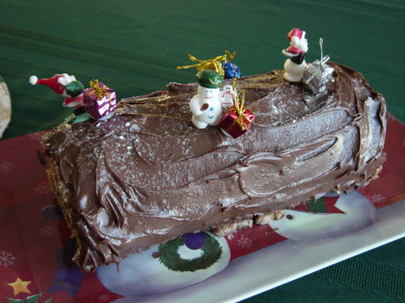
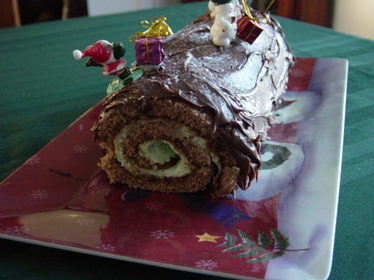
So, a few years ago, I started making my own yule log cake, which is a rolled cake with a filling and frosting made to look like a log. I've never made twice the same cake so far and some have been better than others, but they've all come out pretty good. This year's cake was particularly successful!

My daughter chose the flavors: chocolate and mint! So, off I went to the great internet to find recipes. I found a recipe for a mint and chocolate cake but didn't like the filling cream, so I just used their cake and syrup recipes. I made up my own recipe for the filling and the frosting (nothing fancy or too precise either).

Read More
1 Comment

Puff pastry cheese bites

12/26/2013

0 Comments

 
Picture
For Christmas dinner, I made some easy appetizers. They turned out delicious, even if some improvement is needed. I made two types of cheese bites, one with brie and one with goat cheese.

Ingredients:
  • 1 pack of puff pastry sheets (2)
  • goat cheese
  • brie
  • fig jam
  • honey
  • pecans
  • 1 egg yolk
  • water
Picture
Lesson learned:
  • Puff pastries PUFF, a lot... I forgot about this tip I use for tarts, where you prick the whole dough with a fork to prevent high rising. Definitely something to try next time.
  • It is very hard to find the correct amount of filling. You can't put too much, otherwise you won't be able to close the turnovers. But too little and the puff pastry overwhelms.
  • I put both batches (18 turnovers total) at the same time and after 20 minutes, they were still a bit pale. I did not have the option to keep them any longer, but will definitely bake them separately next time.
Preparation:
  1. Follow directions to let the pastry sheet thaw.
  2. Using a round cookie-cutter, cut as many circles as you can. I used a 3" round cookie cutter and ended up with 9 circles on each sheet.
  3. Preheat oven at 350 degrees.
  4. On half of the circles, place a bit of goat cheese and fig jam in the center of the circle. For the other half, place some brie with honey and pecan bits. Be careful not to put too much as you need to fold them in half.
  5. Brush some water all around the circles, fold them in half and press the edges to seal.
  6. Place them on the prepared baking sheets (I line the baking sheets with parchment paper).
  7. Brush the mini turnovers with the beaten egg yolk. Poke a hole in the pastry to allow for steam to escape.
  8. Bake for 15-20 minutes, until your pastries are golden.
Picture
Popularity result: They were a HUGE SUCCESS!!!! Especially with my teen! Definitely a must keep!
Picture
0 Comments

Crepes

12/25/2013

0 Comments

 
What a crazy week it's been, between a new full-time job, a weekend away with the family and well, the holidays... let's just say I do need many more hours in my days...  I did find the time to do some baking though and will share in the next couple days...
Picture
For her birthday, my daughter asked for some crepes. If you are not familiar with crepes, they are thin round pastries, similar to pancakes (but not really), served in a variety of ways.
You can make savory or sweet crepes and the recipes vary so much, you just need to figure out what you like.
The recipe I use is one I've been using since I was a child. My mother used it and it is so simple, much simpler than many recipes out there.

Ingredients (per person):
  • 100g of flour
  • 1 egg
  • 1 tbsp of sugar (ignore if making savory crepes)
  • milk
  • water
Picture
Picture
Serve with syrup, maple syrup, all kinds of sugars, jams, chocolate spread, etc.
Gives 4-5 crepes per person.
Preparation:
  1. Sift the flour in a large bowl.
  2. Add the sugar and the egg(s).
  3. Add water and milk in equal quantity until getting a bisque consistency.
  4. Use a round griddle (10"). Heat on high heat (drop a few drops of water on it to verify readiness -> if the water sizzles, your griddle is ready).
  5. Pour a ladle-full of batter onto the griddle. Lift and turn the griddle to spread the batter. 
  6. As soon as the batter is not runny anymore, lift the crepe with a knife or a spatula (or if you're better than me, a flick of your wrist) to flip the crepe to the other side.
  7. When cooked, put onto a plate.
  8. CAREFUL: the cooking goes WAY FASTER than for pancakes, a few seconds on each side.
Picture
0 Comments

Cookie Cake

12/15/2013

0 Comments

 
An easy project this week, a cookie cake. Special request from my daughter for her birthday celebration. I use an old recipe, meaning a recipe someone gave me years ago. From the photocopy, it comes from one of those wrappers around a piece of Wilton bakeware, you know, the ones that have recipes on the back. I have no idea where it came from other than that.
Picture
Ingredients:
  • 1/2 cup butter
  • 1/2 cup granulated sugar
  • 1/4 cup packed brown sugar
  • 1 egg
  • 3/4 tsp vanilla
  • 1 1/2 cups all-purpose flour
  • 1/4 tsp baking soda
  • 1/4 tsp salt
  • 1/2 cup semi-sweet chocolate chips

Preparation
:
  1. Preheat oven to 350 degrees. Spray pan with vegetable pan spray.
  2. In large bowl, cream butter with sugars.
  3. Add egg and vanilla and mix well.
  4. Stir in flour, baking soda and salt, mix well.
  5. Stir in chocolate chips.
  6. Spread dough into  prepared pan with spatula.
  7. Bake 15-20 minutes or until light golden brown.
  8. Cool on rack 5 minutes.
  9. Remove from pan. Cool before cutting and decorating.
  10. Makes 8-10 servings.

Picture
Additional notes:
  • I used royal icing to write on the cake. I had purchased tools to work with melted chocolate but used one of the small bottles for the icing. It actually was more comfortable to write with than a pastry bag.
  • The cookie cake's surface is of course very irregular, so do not expect miracles for the writing.
  • The shape of the cake is also irregular as I used a pretty big pan (a pizza pan) and the dough was a good 1.5 to 2 inches from the edges. The cookie did not expand much and reach the edges. Thus the irregular shape.
  • I baked it for 20 minutes. Next time, I'll probably lower the time to 17 minutes. Good color and good taste, not dry, but I wished for a bit more chewiness.
0 Comments

Vol-au-vent

12/8/2013

0 Comments

 
Picture
I have been following the French TV show “Le meilleur pâtissier” and a couple weeks ago, the theme was “puff pastry”. Inspired by it and in need of a quick dinner idea, I put together these vol-au-vent. I had some puff pastry sheets in my freezer, some chicken breasts, mushrooms and heavy cream and there you go. Friends have mentioned my recipe was not the traditional recipe of “vol-au-vent” such as any Belgian will understand it, but I made it with my favorite ingredients and what I had on hand.

Ingredients:
  • 1 pkg of puff pastry sheets (2 sheets per package)
  • chicken breast
  • mushrooms (fresh or canned)
  • 1 medium onion
  • butter
  • heavy cream

Tools:
  • Cookie cutters (3” round and 2” round – you can use a bit bigger too, but you need two different sizes)
Preparation:
  1. Spread the two sheets of puff pastry.
  2. On the first one, using the larger cookie cutter, cut as many circles as you can (I cut 9 with a 3” cutter). Repeat on the second sheet.
  3. Then, using the smaller cutter, cut the center off the second set of circles.
  4. Pick up the rings and using water, seal them on the circles from the first sheet.
  5. Then put the smaller circle back into the ring (no water to seal).
  6. Bake at 350º until puffed and golden-brown (about 10 minutes). Let them cool.

  1. Dice the chicken, onion and mushrooms in ½ inch cubes.
  2. Brown the chicken in a pan, set aside.
  3. Sauté the onion and mushrooms.
  4. Put all three ingredients back in the pan and add heavy cream.
  5. On low heat, reduce the cream to have a thick sauce.
  6. Fill each puff form with the mixture. You can also let the mixture “overflow” on the plate.
ENJOY!!!
0 Comments

Sugar pie

12/8/2013

0 Comments

 
I love this time of year! I love decorating my house for Christmas and I go crazy! I dream of making tons of cookies and decorating them... Notice how I said “dream”? Yes, with my last batch of cookies, I seriously hurt my hands trying to ice them. Hard to imagine, I know, that icing could be a dangerous job, but there you have it. I started decorating with white icing and had to wait for it to dry before starting on color. Well, that never got done. My hands still hurt, almost two weeks later, and unfortunately, my job requires me spending my days in front of the computer, which doesn’t help...

But enough whining, I did manage to do some baking during this past holiday, but forgot to take a picture. I made a sugar pie, a traditional pie from Belgium. It tasted good, but always better the next day. I’m not sure I enjoyed the almonds too much though.

Another aspect of baking I need to work on is the crust. Not the recipe itself, it’s the Flemish piecrust (with yeast), but the baking. I don’t know if I’m using the wrong pan (9” pie pan) but I seem to have such a big edge to this pie and it gets too brown during the baking. I tried covering it with foil but I think I’ll invest in one of those pie edge protectors.

With my husband making his pumpkin pie and a friend making a pumpkin cake, my pie was not the most popular, except for me since *gasp* I don’t like pumpkin... but my daughter did help me finish it in the following days.

I think I will definitely remake one, probably during my Christmas break...

0 Comments

    Enter your email address:

    Delivered by FeedBurner

    RSS Feed

    Table of Content

    Articles listed by date (available soon)

    Archives

    October 2014
    March 2014
    February 2014
    January 2014
    December 2013
    November 2013
    October 2013
    September 2013
    August 2013
    July 2013
    June 2013

    Categories

    All
    Almond Cream
    Apples
    Apple Sauce
    Banana
    Basic Cake
    Bread
    Brownies
    Cake
    Cannoli
    Caramel
    Chocolate
    Cinnamon
    Coconut
    Cookies
    Crepes
    Cupcakes
    Filling
    Frosting
    Fruit
    Icing
    Louisiana
    Madeleine
    Mardi Gras
    Meringue
    Mousse
    Muffins
    Orange
    Pastry Cream
    Pie
    Pop
    Pudding
    Puff Pastry
    Puff Pastry
    Savory
    Shortbread
    Specialty Bread
    Strawberry
    Sugar
    Tartlet
    Vanilla Cream
    Waffles
    Whip Cream
    Zucchini

    Author

    My name is Anne-Sophie and I've always enjoyed baking. I've decided to try and spend more time trying new recipes and would like to share the journey. I am particularly (but not exclusively) interested in French/Belgian recipes.


Powered by Create your own unique website with customizable templates.