Baking Experiences
  • Home
  • Gallery
  • Contact me

Chocolate Chocolate Cake

10/18/2014

1 Comment

 
A couple days ago, it was a friend of mine's birthday, so I offered to make him a cake. He asked me for a very chocolatey cupcake, but I don't like to make cupcakes, so I promised him a chocolate cake. I found this recipe, for which I already had all the ingredients, and that didn't seem too complicated to make. Well, let's just say that it is like the directions on items you buy for the house, you know, the ones you supposedly can assemble in 15 minutes but take you three days?
You know by now that impatience is my weakness. So you'll be proud of me when I say I really took my time with the prep work, making sure I had everything ready. I even managed to stay neat. I made sure I followed all directions to the letter. I was also very excited to use my stand mixer. It worked like a charm, that's for sure.
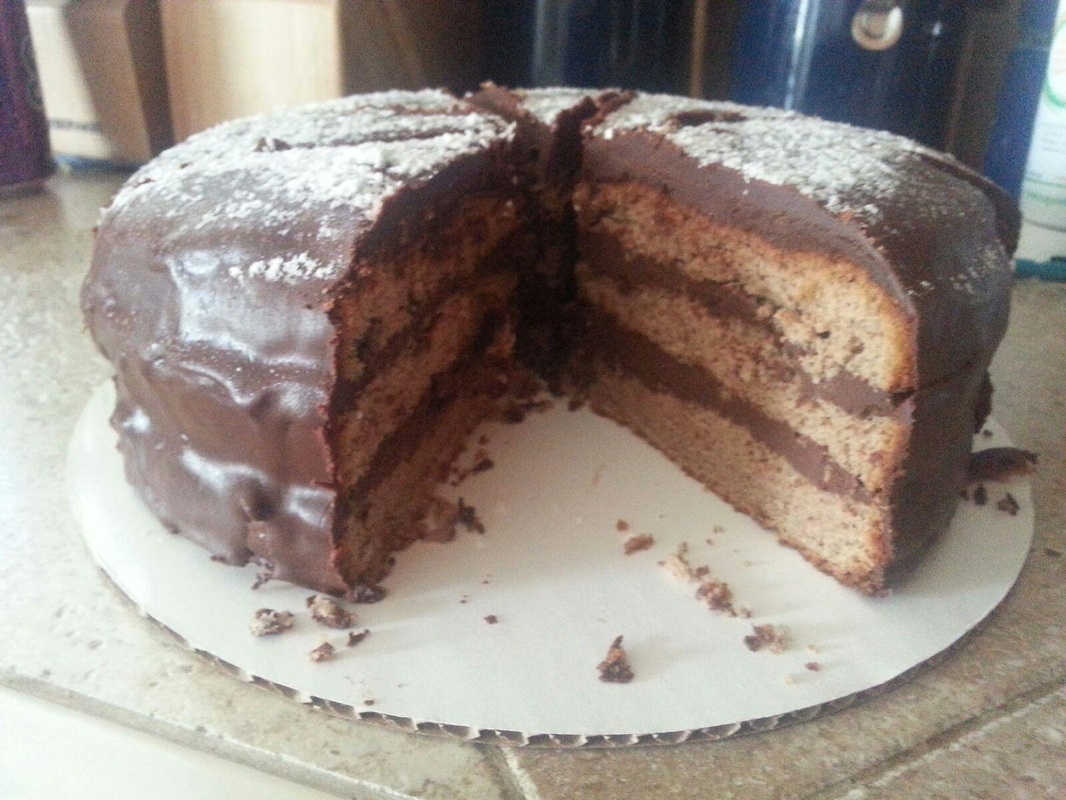
The cake is a genoise, a very light cake. It had a little bit of cocoa powder to make it chocolate. Ooops, I misread the ingredients. It called for unsweetened powder and I had only sweetened cocoa powder. Never mind, it worked. Next problem, the recipe does not specify what size pan to use, so I used an 8" springform pan. The baking took an extra 10 minutes from what the recipe says, but it came out beautifully. The filling is a ganache and the icing is also chocolate.
The problems started when I tried to put it all together. All parts tasted delicious on their own (although I would not recommend eating too much of the ganache or icing, it's a bit much), which was already a big plus.
First issue though: cutting the cake. I had bought one of those cake-cutters with a wire, that help you cut layers in a cake. Well, let's just say that it is hard to use and actually did not work at all for me. So I had to resort to a knife. The result was a bit messy. My layers were ok in terms of thickness but the middle was not flat and there were a lot of crumbs. :-(
Second problem: the ganache. Delicious! But I used almost all of it just for the first layer! So I scrambled to make more, doubling the original recipe since I needed to make two more layers of ganache. I ended up with a lot of ganache left over. Oh well... I would also maybe reduce the cream a little, just to have a slightly thicker ganache.
Third problem, the icing. Same as with the ganache. I did not have enough and scrambled to make a second batch. Now this icing needs to be poured over the cake and supposedly will form a shiny smooth cover. I probably used the wrong chocolate, I also probably did not use enough of the oil, I used half the amount of the recipe. I still did not have enough to cover the whole cake. But the biggest problem was that this icing shows all the imperfections in the cake.
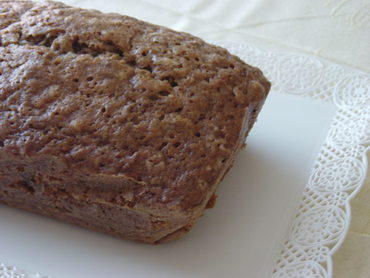
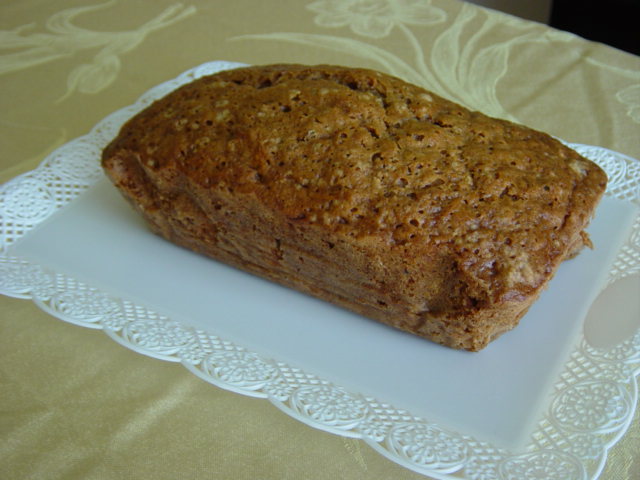
All this being said, I am pretty proud of the end result for a first try at layered cakes. This is definitely one I will try again in the not too distant future. My friend took a picture of the cake, so here it is. I hope he will let you know how it tasted in the comments ;-)
Picture
Any suggestions on how to cut a cake in layers?
1 Comment

I'm baaaack!!!!

10/13/2014

0 Comments

 
Can you believe it has been almost 7 months since my last post?!?!? Crazy work schedule, a trip and a broken leg have prevented any baking since March. And I mean that: NO BAKING WHATSOEVER!!! Can you say "withdrawal"? Anyway, I am at a point now, where I can start walking around again and can stand in the kitchen instead of using the family as my personal servants and fetchers. And so I decided to start again. Some of you have been asking about the blog, so here I am. Please leave comments, they are always appreciated!
Picture
I decided to start with a tried and true recipe, my country bread. I love it! It is so versatile. When it is fresh, it is delicious with just butter, jam, or chocolate spread. Use it for sandwiches, croque-monsieur or French toast. Toast it with your favorite topping (mine is goat cheese), use it for croutons or in bread pudding.

The second project of the weekend was to revisit meringues. I tried a different recipe and, although the result tastes ok, it was not my favorite. I did not manage to get the mix stiff enough to pipe it the same way I did before. So I ended up with little buttons. They're cute and could easily be used for cake decorating. Right now, I made little sandwiches with chocolate ganache.
Picture
Picture
And the final project of the weekend was my first attempt at making a cheesecake. This is my husband's favorite dessert and we had some of of those graham cracker pie crusts that needed using. I found a recipe on a French website that gave a wonderful result. My husband loved it. Lessons learned here: warm up the cream cheese before using for a smoother filling (although the end result did not show any lumps). I also need to figure out how to cut it neatly. I passed a knife under hot water after a couple cuts, and it helped, but do you have a better suggestion?

So, let me know what you think. I cannot promise a weekly post, but I promise not to wait another 6 months! Happy baking!
0 Comments

Madeleines

3/23/2014

1 Comment

 
Wow, time flies! I didn't get to bake last weekend but I did do a few things this weekend. I have been wanting to do a recipe that I collected when I was in high school. We had one of those semester electives where we baked and cooked.
Picture
Madeleines were made famous by Proust who would remember his childhood when smelling madeleines.
Madeleines are recognizable by their ridges on one side and that little bump on the other side. My "bumps" were pretty mild compared to some pictures I've seen. I've read that a way to do this is to actually keep the batter in the fridge for a couple of hours, if not all night. Definitely something to try next time.

There are many recipes for madeleines and the textures vary. They are delicious with a good cup of coffee, tea or hot chocolate.
This recipe gives a very cake-like madeleine, reminiscent of the quatre-quart cake. Some people might find it too heavy, although the size should help with that.
Picture
Ingredients:
  • 300g flour
  • 300g sugar
  • 250g butter
  • 4 eggs
  • 1 pinch of salt

Preparation:
  1. Preheat the oven at 435 degrees.
  2. Melt the butter.
  3. Beat the eggs until you get a whitened mix.
  4. Add the sugar and keep beating.
  5. Add the cold melted butter.
  6. Add the sifted flour.
  7. Mix.
  8. Butter and flour the molds. Put one table spoon of better in each mold.
  9. Bake for 10 minutes.
Picture
1 Comment

Zucchini bread

3/9/2014

0 Comments

 
Picture
My daughter has been begging me to make a zucchini bread I made several years ago. It's amazing what stuck in children's minds. They can't remember what you asked them to do 10 minutes ago but can remember a cake from 3 years ago.
So anyway, I went searching through my recipes and found it. So, here it is...

Ingredients:
  • 3 cups all-purpose flour
  • 1 tsp salt
  • 1 tsp baking soda
  • 1 tsp baking powder
  • 3 tsp cinnamon
  • 3 eggs
  • 1 cup vegetable oil
  • 1 1/4 cups white sugar
  • 3 tsp vanilla extract
  • 2 cups grated zucchini
  • 1 cup chopped walnuts
Picture
Directions
  1. Grease and flour two 8 x 4 inch pans. Preheat oven to 325 degrees F (165 degrees C).
  2. Sift flour, salt, baking powder, soda, and cinnamon together in a bowl.
  3. Beat eggs, oil, vanilla, and sugar together in a large bowl. Add sifted ingredients to the creamed mixture, and beat well. Stir in zucchini and nuts until well combined. Pour batter into prepared pans.
  4. Bake for 40 to 60 minutes, or until tester inserted in the center comes out clean. Cool in pan on rack for 20 minutes. Remove bread from pan, and completely cool.
Picture
Notes:
  • I reduced the amount of sugar by 1 cup. I remember last time that it was quite sweet. This is a bit better.
  • I have read in the past that one can use apple sauce to replace the oil and I think that is something I plan on doing next time.
  • The cooking time was off. One of the cakes was done after 65-70 minutes, the other one took an additional 15 minutes. I don't know if it is due to the pan's material (the glass one took longer).
Picture
Results:
One word - YUMMY!!!!
It helped to reduce the sugar. I'd probably reduce the cinnamon a bit too. But the cake is nice and moist. You can taste the zucchini without TASTING the zucchini if you know what I mean...
0 Comments

Shortbread cookies with salted caramel

3/3/2014

1 Comment

 
Picture
I have found paradise! Kidding... but close...
The challenge this weekend was a recipe taken from the French show "Le meilleur patissier" (The best baker). The part that scared me: making caramel. It turned out to be easier than expected and the result is a divine gooey mess, a finger-licking-good sauce that makes you think about finding as many recipes as you can that need caramel.

Ingredients:
For the cookies:
  • 500g flour
  • 250g softened butter
  • 2 tsp vanilla extract
  • 2 egg yolks
  • 140g sugar
For the caramel:
  • 200g sugar
  • 160g heavy cream
  • 60g salted butter, cut in small pieces
Notes:
Although I try and keep the same quantities, some substitutions in the ingredients are unavoidable. For example, finding vanilla sugar here requires a trip to a specialty store.

Sugars are also different: Mainly in the US, it is generally made from sugar cane while it is made from sugar beets in Europe. The refining levels are also different. The original recipe called for powdered sugar. I didn't get it, so I used regular sugar. I loved the result, so no worries...

There are three types of butter in France: unsalted, half-salted and salted, based on the percentage of salt in the butter. Our salted butter is more like the French half-salted, therefore any recipe requiring salted butter will be less salted than the French result. Personally, I don't mind, but if you do...

Picture
Preparation:
I. Make the caramel:
  1. Make sure your pan is very clean. I used a medium sauce pan.
  2. Pour enough of the sugar in a pan to have a thin opaque layer on the bottom. Heat at low/medium heat.
  3. When the layer starts looking slightly transparent, add mode sugar. Keep doing this until all the sugar is in. Do not disturb the sugar with a spoon or anything.
  4. Let the sugar melt. When all the white is gone, you can start using a wooden spoon. Careful, sugar is very hot and can burn!
  5. In the meantime, boil the heavy cream.
  6. When the sugar is all liquid, remove from heat and slowly pour the boiling cream in it, while whisking it.
  7. Put it back on the heat and keep mixing until it thickens a little. A spoon dipped in it should come out covered.
  8. Add the salted butter and stir until thoroughly blended.
  9. Pour into a bowl, cover, let it cool then store in fridge.
Picture
II. Make the cookies
  1. Mix the flour and the butter with your fingers to form a sandy mix.
  2. Add the sugar, vanilla and egg yolks.
  3. Bring the dough together, adding a bit of milk if necessary (I added 1 tbsp).
  4. Film the dough and put in the fridge for 15 minutes.
  5. Spread the dough to a 1/8" thick sheet.
  6. Using a cookie cutter, cut the cookies. In half of them, cut a circle in the middle.
  7. Bake at 350 for 9-12 minutes.
  8. When your cookies cool down, assemble them: put a little bit of caramel (careful, when warming up, it starts running) on the bottom cookie and cover with the top cookie, previously powdered.
Picture
Enjoy!
Do you have ideas of recipes using caramel?
Share in the comments
.

1 Comment

Blog update

2/24/2014

0 Comments

 
Hello everyone!
I was going through the blog, going back to the beginning. Can you believe it's already been 8 months and about 60 recipes (counting the failures)?

For myself but also for you readers, I've decided to update the Gallery (look for the link at the top of the page). In the Gallery, you will find pictures of almost all recipes. They are not linked back to the articles yet, but hopefully, one day...


Let me know what you think, what you've tried, what you want to try...

Spread the word, invite people to check my blog. Granted, it's nothing extraordinary, but ... you know what I mean...

Thank you and Happy Baking!

Anne-Sophie
0 Comments

Croustade gersoise

2/23/2014

0 Comments

 
While watching a French pastry competition, the candidates were required to make this croustade. Traditionally, the dough is stretched really thin over a large table, then rolled with the filling and then as a spiral (although comments on the recipe from people of that area say that the spiral shape was not typical). Needless to say, there was no way I would ever do that, I'm not crazy!
Picture
Then one day, while looking through cooking/baking blogs, I came across this recipe. The author of the blog proclaims proudly to be a modern woman and using modern ingredients to make her life easier.

And so, I decided to try it. I liked the idea of working with phyllo and the look of it, in my mind, allowed for the unavoidable tears in phyllo dough. So here I go.

The results were mixed and there is lots of room for improvement but here are some notes.
APPEARANCE:
  • It looked beautiful! I just loved the top of the pastry, golden, delicate. It just was very pretty.
  • I wonder if I put too much phyllo dough on the top and that's why it is not more uniform in the color.
TASTE:
  • My daughter and I thought the taste of the orange blossom water was too strong, overpowering. I followed the recipe except I didn't use armagnac. Does this alter the taste of the orange blossom water? I don't know, but it was strong.
  • On the other hand, my husband thought the taste was pretty bland. Go figure!
Picture
Notes:
  • I used the listed number of apples but ended up with only one layer of apples. Compared to the amount of phyllo dough, that might explain the blandness. I don't know if I used too big of a pie pan, but that needs to be rectified.
  • I think I used too much phyllo. I know I used more than the recipe called for. Part of it is because the sheets came apart pretty much as soon as I opened the package. I got lucky to find some sheets torn only on edges to be able to make the bottom of the pie but otherwise, it was just pieces.  The top was really fluffy, maybe too much since the layers inside were rather white...
  • I realized I forgot to use the sugar... Oooops!
  • I had to bake it for 30-35 minutes instead of the 15-20 minutes mentioned in the recipe, just to get to the color. Again, is it due to the layer of phyllo?
Picture
Next time:
  • I'll use less orange blossom OR replace it with vanilla or even add cinnamom.
  • I'll use less phyllo... :-)
  • See about using a different pie pan.
  • Use more apples.
Picture
What about your experiences with phyllo dough?
0 Comments

Mardi Gras King Cake

2/13/2014

7 Comments

 
Picture
This is a recipe I have been wanting to try forever! I lived in Louisiana for a few years and just loved this tradition, how people eat this cake all Mardi Gras season. It was a neat way to end the day on Fridays at the office. People in Louisiana are always very convivial and I've learnt so much about the various traditions (besides what people see on TV) of the Carnival season in Louisiana. So this is a salute to those whose friendship made these years fantastic!

The recipe I found was this one. I don't remember when I found it but apparently it comes from the February 2006 edition of Southern Living. Well, I can tell you I am incredibly happy with the end result, so this recipe goes into the family recipe book!
Picture
A couple of notes from this recipe, fortunately, nothing major ;-)
  • The recipe mentions that it yields 2 cakes of about 18 servings each. I'd say closer to 12-13.
  • Baking is 14-16 minutes, I baked 20 minutes because there was no color on top.
  • Prep time: 30 minutes -- it's a joke!
  • You are told to use a heavy-duty electric stand mixer. I don't have one (yet!!! It's on my wishlist), so I used my hand-held mixer. Let's just say the poor thing couldn't handle mixing the dough. I got that "something's burning" smell. I ended up doing it by hand (actually with both hands). Good work out!
  • Spreading the dough to a rectangle of 12 by 22 is hard. I'd say try 10 inches by 20. If you want everything to look neat, trim the rectangle to make it all even.
  • When spreading the filling (I did the cinnamon sugar filling), know which way you will start rolling the dough and don't put filling on the edge you will end the roll with. The bottom of the cakes were a bit hard. I think sugar escaped and caramelized, making for a hard shell.
  • You might want to do a better job than I did in sealing the edges together.
  • The icing is powdered sugar, with a little lemon juice and water. The first icing I did was a little too runny, so I made the other one thicker.
  • I used colored crystal sugar but my green was way too pale :-( Look for the Irish green sugar...
Picture

The result

A cake that is closer to a brioche than a typical cake. It is actually very close to a cinnamon bun. Delicious with coffee or hot chocolate.
Picture
I am very happy with the result! And proud of myself too! :-D
7 Comments

Meringues

2/7/2014

0 Comments

 
Picture
I had some egg whites leftover, 6 of them to be exact, and I was looking for a way to use them. So I tried meringues. I was a bit leery but am I glad I made them. They are just DELISH!!!!
I looked around for simple recipes, found one I could use but ended up modifying it. My final result is a keeper!
The recipe I found called for 4 egg whites and 350g of sugar. Now, meringues are supposed to be sweet but this sounded like a huge amount of sugar. Many comments on that recipe called for less sugar... So this is what I came up with...

Ingredients:
6 egg whites - 200g sugar

Preparation:
Start beating the whites. When they start getting foamy, add the sugar a little at a time. Keep beating until firm and glossy. The egg whites should form a beak on the whisk when you remove it from the whites. Pour the preparation into a pastry bag with a large star shaped tip. Place your meringues on a parchment-paper covered cookie sheet, about 1 inch apart. Put in the oven at 195 degrees for about 2hours.

Notes:

  • Some recipes called for the use of vinegar and cornstarch to guarantee the whitest meringues. Mine had a very light tan but it was uniform and glossy so not off-putting.
  • The recipe I used as a basis was giving as baking directions: 20 min at 245 degrees and then one hour at 210. I followed that and I think that is where the tan comes from. I then looked it up some more and have determined that 195 degrees for 2 hours seems more the norm. Leave the meringues in your oven after you turn it off to continue letting them dry.
  • I used granulated sugar. Many recipes seem to call for powdered sugar. Since powdered sugar has cornstarch in it, it might be a good idea to use it to maybe get that white meringue. I however do not regret my choice.
  • This quantity is a lot. I have wasted half of it, following the dual temperature baking instructions. If baking everything at 195, I would keep baking all of them. As it was, half the quantity gave me about 75 bite-size meringues.
  • These are basic meringues but it got me thinking of possibilities. So I will definitely be looking into this again.

Have you ever made meringues? Do you have recipes to share?
Picture
0 Comments

Eclairs

2/6/2014

1 Comment

 
Picture
Last weekend's project was "eclairs". I needed to revisit the dough I used for the cream puffs AND the recipe for the vanilla cream used to stuff them.
I remembered some lessons, forgot others and will need to do this again to keep improving. Not that I seem to run out of people willing to try the desserts...
All in all, this week's experiments tasted really good, I just need to work more on the appearance side of things. I would say that my major fault here is my impatience. I just want to go too fast. What is frustrating is that I KNOW I am going too fast as I do it but I can't seem to slow myself down. This was particularly the case with the chocolate ganache in this case.

The eclairs recipe

For the eclairs, I used this recipe, it is a basic recipe, pretty easy to accomplish. That was not the issue. However, I'm always amazed at how hard it is to deal with oven temperatures and length of baking. See, this recipe is used to make little cream puffs, eclairs and many more other items. Everything is different, different sizes, different thickness, so the temperature and length of baking will be different for each one.
Now, as you are baking, it is not so hard to say "ok, a couple minutes more". What is hard though is to keep track of how you modify the time for the next time you want to do this. And I haven't even figured out how to play with the temperature. How do you know which temperature would be the best for your project?
Picture
One of the lessons I had learnt from making the cream puffs was that the size of the batter you put on the sheet does not change much when baking, it doesn't rise and double volume or anything close to that. So I made sure my eclairs were close to the size I wanted in my final product.

However, in my first batch, I poured the batter in a kind of rope and did a "folded" rope to ensure enough width. Well, the result was disappointing. The rope was not thick enough or high enough, which means those eclairs were flat. And the two parts of the rope did not mesh completely during baking, which gave me eclairs with a weird valley in the middle. This batch tasted good but looked horrible.

So for the second batch, I kept the pastry bag closer to the baking sheet and made sure to pour more batter. Frankly, I could have gone even further. I should have ended up with a sausage-like batter about one inch thick. The other thing is how hard it is to keep that pastry bag steady and pour the batter in a uniform way. I ended up with some funky shaped eclairs.

All in all, taste-wise, this was a success. Look-wise, well, there is still work to be done...

The cream

Picture
For the cream, I used the same recipe I used when I made the King Cake. The only mistake I made was once again due to my impatience. Small detail but it shows how important it is. I used the wrong measuring spoon to measure the vanilla extract and poured a bit too much of it.
The cream tasted good otherwise, however, I think I'm looking for something that has more firmness to it, more thickness.
Stuffing the eclairs was not easy, even if I used the smallest tip I had. I'm going to look into long and thing injectors or something like that. It is also really hard to know when to stop filling... because when it starts oozing out of the eclairs, it's too late...

The chocolate ganache

Picture
Technically, this was the easiest part, just melt chocolate and mix with some heavy cream. Once again, my impatience got the best of me and my chocolate was grainy and my ganache a bit too thick.

Now, I know why I was so impatient that day, it was the traditional day for crepes and I had guests over for crepes. Why did I start another project on the same day? Who knows but definitely not something to repeat. *embarrassed*


In the end, I'm glad to say I made eclairs. The taste was really good, so I know the recipes work, I just need to work on technique and appearance. and  PATIENCE!!!

There is hope!

What is your weakness when baking?
1 Comment
<<Previous

    Enter your email address:

    Delivered by FeedBurner

    RSS Feed

    Table of Content

    Articles listed by date (available soon)

    Archives

    October 2014
    March 2014
    February 2014
    January 2014
    December 2013
    November 2013
    October 2013
    September 2013
    August 2013
    July 2013
    June 2013

    Categories

    All
    Almond Cream
    Apples
    Apple Sauce
    Banana
    Basic Cake
    Bread
    Brownies
    Cake
    Cannoli
    Caramel
    Chocolate
    Cinnamon
    Coconut
    Cookies
    Crepes
    Cupcakes
    Filling
    Frosting
    Fruit
    Icing
    Louisiana
    Madeleine
    Mardi Gras
    Meringue
    Mousse
    Muffins
    Orange
    Pastry Cream
    Pie
    Pop
    Pudding
    Puff Pastry
    Puff Pastry
    Savory
    Shortbread
    Specialty Bread
    Strawberry
    Sugar
    Tartlet
    Vanilla Cream
    Waffles
    Whip Cream
    Zucchini

    Author

    My name is Anne-Sophie and I've always enjoyed baking. I've decided to try and spend more time trying new recipes and would like to share the journey. I am particularly (but not exclusively) interested in French/Belgian recipes.


Powered by Create your own unique website with customizable templates.