Baking Experiences
  • Home
  • Gallery
  • Contact me

Apple sauce

9/30/2013

0 Comments

 
Picture
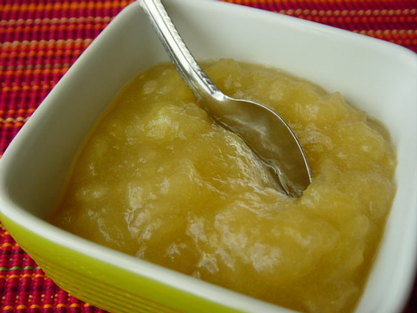
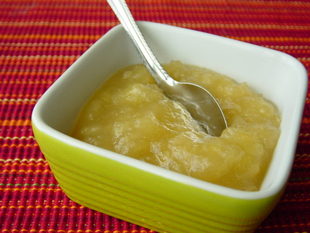
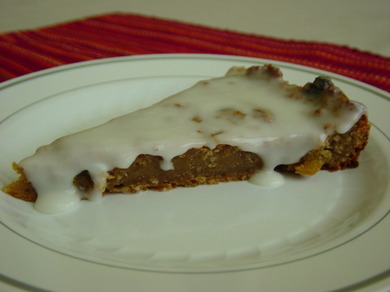
This was so good and so easy to make.
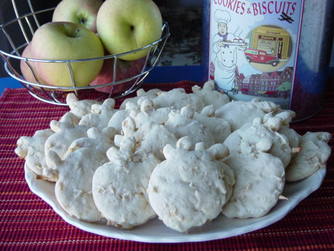
I used some leftover apples from my visit to the festival. But I can see myself making larger quantities in the future. Always good to research the best apples.

Ingredients:
2-3 large apples, diced. (about 800g)
10 cl of water
2 tbsp of vanilla extract
150g of sugar

Preparation:
  1. In a saucepan, bring to a boil the water, vanilla and sugar.
  2. Add the apples and reduce the heat.
  3. Let it cook on low heat until you like the texture.
  4. Let it cool and put in mason jars.
  5. Gives 3-4 small bowls of apple sauce.
Picture
0 Comments

Apple cookies

9/27/2013

0 Comments

 
Last weekend, the whole family piled up in the car and we went to an apple festival. It was fun, not huge, but nice anyway. And I did purchase apples. Unfortunately, although I asked the vendor which apples were best for baking, I made the mistake of not taking pictures of the apples with their names. It would have been so much easier than trying to figure out what these apples were and how to use it once they made it home. But I tried...

However, for future reference, I did find these two websites (one and two) that list all the varieties of apples and how to use them. Very useful!

So, with all these apples, I wanted to make a couple of things. More than two, actually, but my husband ate a lot of the apples... they were indeed delicious!

Picture
I wondered if apple cookies existed, so I looked, both on English and French websites. And I found this recipe. It looked really good and the picture made me salivate. However, a word of warning, the end product I got was so far from that picture, that it looks like a different recipe. I have a few ideas as to why, but I’ll come back to that.


Read More
0 Comments

Cream Puffs

9/22/2013

0 Comments

 
Picture
A classic of French pastry, it was time I tried it, especially when friends seem to make it so easily. So today, I did! I used this recipe recommended by my friend Anne-Laure.

First, I started with the cream, as it takes a long time to cool down.


Ingredients:
  • 500ml of milk
  • 1 pkg of vanilla sugar (= 1 tsp of vanilla extract)
  • 2 tsp of vanilla extract
  • 100g sugar
  • 2 egg yolks
  • 1 egg
  • 50g of flour
  • Pinch of salt

Preparation:
  1. In a saucepan, bring to a soft boil the milk, vanilla sugar, vanilla extract and salt. Stir constantly to avoid burned milk on the bottom.
  2. In the meantime, in a large bowl, combine the sugar, the egg yolks and the egg and mix them with a wooden spoon until it becomes a light yellow. 
  3. Add the flour and mix.
  4. Add the boiling milk a little at a time. Keep mixing.
  5. Put everything back in the saucepan and put it back on the stove on low, stirring constantly, until it thickens.
  6. Pour the cream in a bowl and let it cool. You can cover with saran wrap touching the cream to prevent a skin forming on the surface of the cream. Refrigerate when cooled to room temperature.

Notes:
  • “until it thickens” is pretty vague, at least for me. How thick does it have to be? As I was waiting for the cream to get closer to a pudding consistency (still stirring), lumps began forming. Before the whole thing turned into a big lump, I transferred it to the bowl and used a whisk on the cream, which got rid of all the lumps. So, keep an eye on this. I guess practice makes perfect... this was the second attempt at pastry cream (see last week’s post) and it was much better than the first!!!!


Read More
0 Comments

Bread Pudding

9/16/2013

0 Comments

 
So, what do you do when you have stale country bread, the bread you took apart to make troughs, stale coconut macaroons and stale cookies? You make bread pudding... the Belgian way...
Picture
Ingredients:
  • 1 cup raisins
  • 1/4 cup apple juice
  • 5 cups packed bread/cookie crumbs
  • 3/4 cup milk
  • 1 cup dark brown sugar
  • 2 tbsp honey
  • 6 tbsp unsalted butter
  • 1 tsp cinnamon
  • 1 tsp ginger
  • 4 large eggs, separated
  • pinch of salt

Preparation:
  1. In a small bowl, soak the raisins in the apple juice for one hour.
  2. Preheat the oven to 400 degrees. Butter and flour a 10" round pan.
  3. Combine the bread and milk in a large sauce pan and let it sit for 10 minutes.
  4. Add the raisins and the juice, the sugar, honey, butter, cinnamon and ginger. Bring to a boil, stirring constantly with a wooden spoon. The mix will become homogenous and smooth and should be thick.
  5. Off the heat, stir in the yolks, one at a time.
  6. Beat the egg whites with the salt to soft peaks and fold gently in the mixture.
  7. Pour the mixture in the pan and bake 35-40 minutes (until knife comes out clean). Let cool completely.
  8. I added an icing made with lemon juice and powdered sugar. It is quite tart but goes well with the pudding.
RESULT: It tastes quite good. It is not too sweet but balances the icing really well. I wish I had used a smaller pan (I used a 12") for a thicker cake but then it might have been too much.
Picture
Notes:
  • I did not have 5 full cups of bread crumbs, so I "adapted" the quantities (which might or might not have been a good idea)... I mean, the taste was good but I don't know if it's due to luck or if I did well in eyeballing different quantities.
0 Comments

A taste of Belgium

9/15/2013

0 Comments

 
Invite a few friends over who don't mind being guinea pigs and try out new recipes... kind of... A mix of tried and true and new is always safest and having a contingency plan, a must (for me, at least, as one of my friend was teasing me about last night).

Main Course: Stuffed faluche

Picture
I found this recipe/idea online. When I was researching recipes for the faluche a few weeks ago, I came across a video from my hometown's TV where this preparation was explained and it sounded soooooo good, I just needed an excuse.

This recipe can be prepared as an appetizer or a main course, just change the size of the bread.

Ingredients:
  • Individual faluches (see previous post) - a bit thicker than normal to be used as dish.
  • Butter
  • Smoked salmon
  • Salmon (fresh or canned) - I used fresh
  • Extra-small shrimp or salad shrimp
  • Mixed greens
  • Tomatoes or asparagus
  • Head of lettuce
  • Mayonnaise
  • Salt, pepper, herbs
  • Vinaigrette
Preparation:
  1. Poach the salmon (5-7 minutes in boiling water). Then take it apart with your fingers. Delicately mix it with mayonnaise, salt, pepper and your favorite herbs. Do not crush the salmon.
  2. Take your faluches and cut from the top to make some kind of trough. Remove the bread inside and either set aside for different use (making bread crumbs, pudding...) or discard.
  3. Butter your bread trough and line with smoked salmon.
  4. In a separate bowl, mix your greens with your vinaigrette. I used store-bought raspberry vinaigrette but you can make your own. Try and use perfumed vinegars and different oils.
  5. Put some of the greens on top of the salmon.
  6. On the bed of greens, put some of your salmon salad.
  7. Decorate the whole thing with pieces of rolled smoked salmon, tomatoes or asparagus, and shrimps.
  8. Place on a plate covered with leaves of lettuce. Place more of the tomatoes or asparagus around your faluche for decoration.
The food itself is fresh and very summery. The size of the faluche dictates how hungry you have to be. All in all, I am really happy with the way it came out and this is definitely going on the must-have list. And when you think about it, many variations are possible, both sweet and savory.


Read More
0 Comments

Baguette (part 1)

9/12/2013

1 Comment

 
OK, this is going to be a short post... and no pictures, it's too embarrassing. Instead, I found pictures on the internet to try and make it clear. I found this recipe, promising a baguette in 30 minutes. Now, I was realistic, thinking, if I can do it in one hour, I'll be happy.
Picture
PictureThis is what I was expecting...
So I started this recipe. First flag: it called for very warm water mixed with sugar and yeast. I've always been taught and always read that water that is too warm kills the yeast. Also, that yeast touching sugar or salt before being activated is also killed. But, hey, I followed the recipe.

Next was adding the salt and flour. It called for 3-4 cups of flour until you get a soft dough that is not sticky. You know, it reminded me of my attempt at pretzels. I kept getting a dough that was soft, sticky in areas and then so dry in other areas that pieces were falling off. I used almost 5 cups of flour, so contrary to the pretzel attempt, I used more flour than called for. So at what point do you say "well, I guess I'll try now..."?
Picture
Picture
And then came the dreaded rolling. I don't know why I just cannot roll dough. Why doesn't it work? Anybody has ideas of suggestions? Is it the surface? Should I do something with the dough? With my hands? I used the technique shown up here and should have ended with something like what you see on the right.

Instead, I have two HEAVY and not completely baked "baguettes" that look horrible, or if I want to be generous, they look rustic, you know, with lots of flour on top... The crust is kinda crispy but the inside... And I left them in there for 25 minutes, when the recipe called for 15-18 minutes.

I am so disappointed, so if you know a recipe for a good baguette, please share in the comments. If you have suggestions to roll the dough, please share. I think I will see what result I get with my bread machine but I need to solve the rolling issue. THANKS!!! Well, I guess that's why I chose to call this blog "experiences"...
Picture
1 Comment

Sables au beurre (butter cookies)

9/6/2013

0 Comments

 
Picture
This week’s challenge: making a few dozen cookies on a French theme for a local event. I wanted to work with a French recipe, easy to make, but challenging me, of course.

So I chose “sablés”, which are dry cookies (sable = sand) that can be shaped by hand, with a knife or with a cookie cutter. The recipe is fairly simple and does allow for slight variations of taste (adding lemon juice, lemon zest, orange juice). The beauty of these cookies is that you can use your imagination in the decorating.

Recipe for the cookies

Picture
Ingredients:
  • 1 egg
  • 120g of sugar
  • 1 packet of vanilla sugar or 1 tsp of vanilla extract
  • 250g of flour
  • 125g of softened butter

Preparation:
  1. Mix in a large bowl: the egg, a pinch of salt, the sugar and the vanilla. Mix with a wooden spoon until pale and creamy.
  2. Add the flour then mix with your fingers until it looks/feels like sand.
  3. Add the butter and mix until you get a dough.
  4. Hit the dough by throwing it from hand to hand until you get an homogenous ball. If the dough is too fat or soft, add a bit of flour.
  5. Wrap the dough in saran wrap and let it rest in the fridge for 30 minutes.
  6. Put some flour on a flat surface and on your rolling pin, then spread the dough until ¼” thick.
  7. Cut your cookies, using a knife, cookie cutter or glass.
  8. Put the cookies on a cookie sheet covered with parchment paper.
  9. Bake in a 350 degree oven for 12-15 minutes (until the edges start to VERY SLIGHTLY brown.

By tripling the recipe, I got around 46 cookies (2 different shapes), counting the ones that were not fit for company. I ended up with 42 "useable" ones. Note that my cookies are fairly big (5" tall and 3" wide at their largest).

Read More
0 Comments

Rochers (coconut macaroons)

9/3/2013

2 Comments

 
First of all, I apologize. It's been 10 days since I posted. I've been busy, mind you, but didn't do anything new that warranted posting. I did make more of the faluche, as my daughter wanted some individual ones to make as sandwiches to take to school, but didn't get around to something else until today. So here it is!
Picture
This morning, I made "rochers", a Belgian specialty one can now find anywhere. Although I don't make them often, they are a favorite with my daughter and her friends. They are very sweet and sticky, so one cannot eat many at a time (which I guess is a good thing! ;-D ).

Recipe

Ingredients:
  • 1 bag of unsweetened shredded coconut (14 oz.)
  • 1.5 cup of sugar
  • 4 egg whites
  • 1 tsp of almond extract
  • 1 tsp of vanilla extract

Preparation:
  1. Preheat oven at 350 degrees.
  2. Mix all ingredient in a bowl until well blended.
  3. Form small balls (1.5 in) and place on a baking sheet covered with parchment paper.
  4. Bake for 15 minutes.
  5. Let it cool on a cooling rack (I just pulled the parchment paper onto the cooling rack).


Notes:
  • Next time, I will probably reduce the amount of sugar to 1 cup or make sure I use unsweetened coconut. I will also mix with 3 egg whites and only add the 4th if I need more binding.
  • You can replace the almond and vanilla extract with any kind of extract you like that would be compatible with coconut. I used what I had on hand.
  • When baking, you will see the sugar and egg whites spread, so that when baked, each rocher will have a "collar". I used a 2" round cookie cutter to remove that "collar", but wait until your cookies are completely cool.
  • It is hard to determine when it is ready as the top browns but the inside stays gooey. I made the mistake of putting two sheets together in the oven and a couple cookies did not cook properly.
Picture
2 Comments

    Enter your email address:

    Delivered by FeedBurner

    RSS Feed

    Table of Content

    Articles listed by date (available soon)

    Archives

    October 2014
    March 2014
    February 2014
    January 2014
    December 2013
    November 2013
    October 2013
    September 2013
    August 2013
    July 2013
    June 2013

    Categories

    All
    Almond Cream
    Apples
    Apple Sauce
    Banana
    Basic Cake
    Bread
    Brownies
    Cake
    Cannoli
    Caramel
    Chocolate
    Cinnamon
    Coconut
    Cookies
    Crepes
    Cupcakes
    Filling
    Frosting
    Fruit
    Icing
    Louisiana
    Madeleine
    Mardi Gras
    Meringue
    Mousse
    Muffins
    Orange
    Pastry Cream
    Pie
    Pop
    Pudding
    Puff Pastry
    Puff Pastry
    Savory
    Shortbread
    Specialty Bread
    Strawberry
    Sugar
    Tartlet
    Vanilla Cream
    Waffles
    Whip Cream
    Zucchini

    Author

    My name is Anne-Sophie and I've always enjoyed baking. I've decided to try and spend more time trying new recipes and would like to share the journey. I am particularly (but not exclusively) interested in French/Belgian recipes.


Powered by Create your own unique website with customizable templates.